Animations#
Magpylib can display the motion of objects along paths in the form of animations.
Hint
Animations work best with the plotly backend.
If your browser window opens, but your animation does not load, reload the page.
Avoid rendering too many frames.
Detailed information about how to tune animations can be found in the graphics documentation.
Simple Animations#
Animations are created with show() by setting animation=True. It is also possible to hand over the animation time as a float with this parameter.
import magpylib as magpy
import numpy as np
# Define magnet with path
magnet = magpy.magnet.Cylinder(
polarization=(1, 0, 0),
dimension=(2, 1),
position=(4, 0, 0),
style_label="magnet",
)
magnet.rotate_from_angax(angle=np.linspace(0, 300, 40), start=0, axis="z", anchor=0)
# Define sensor with path
sensor = magpy.Sensor(
pixel=[(-0.2, 0, 0), (0.2, 0, 0)],
position=np.linspace((0, 0, -3), (0, 0, 3), 40),
style_label="sensor",
)
# Display as animation - prefers plotly backend
magpy.show(sensor, magnet, animation=True, backend="plotly")
Animated Subplots#
Subplots are a powerful tool to see the field along a path while viewing the 3D models at the same time. This is specifically illustrative as an animation where the field at the respective path position is indicated by a marker.
# Continuation from above - ensure previous code is executed
magpy.show(
dict(objects=[magnet, sensor], output=["Bx", "By", "Bz"], col=1),
dict(objects=[magnet, sensor], output="model3d", col=2),
backend="plotly",
animation=True,
)
It is also possible to use the show_context context manager.
# Continuation from above - ensure previous code is executed
with magpy.show_context([magnet, sensor], backend="plotly", animation=True) as sc:
sc.show(output="Bx", col=1, row=1)
sc.show(output="By", col=1, row=2)
sc.show(output="Bz", col=2, row=1)
sc.show(output="model3d", col=2, row=2)
Exporting Animations#
Animations are wonderful but can be quite difficult to export when they are needed, for example, in a presentation. Here we show how to creat and export animations using the *.gif format.
Built-In Export#
The easiest way to export an animation is via the Magpylib built-in command animation_output in the show() function. It works only with the Pyvista backend. The following code will create a file “test4.gif”.
import magpylib as magpy
import numpy as np
# Create magnets with Paths
path = [(np.sin(t) + 1.5, 0, 0) for t in np.linspace(0, 2 * np.pi, 30)]
cube1 = magpy.magnet.Cuboid(dimension=(1, 1, 1), polarization=(1, 0, 0), position=path)
cube2 = cube1.copy(position=-np.array(path), polarization=(-1, 0, 0))
# Store gif with animation_output using Pyvista
magpy.show(
cube1,
cube2,
style_legend_show=False,
animation=3,
animation_output="my.gif",
backend="pyvista",
style_path_show=False,
)
Custom Export Pyvista#
For customizing videos it is best to work directly in the respective graphic backends. Here we show how to transfer the Magpylib graphic objects to a Pyvista plotter, customize the plotting scene, export screen shots, and combine them in a *.gif. The following example also shows how to achieve transparency.
import magpylib as magpy
import pyvista as pv
from PIL import Image
def create_gif(images, frame_time, output_file):
"""Create a GIF from images"""
frames = [Image.fromarray(img) for img in images]
if frames:
frames[0].save(
output_file,
format="GIF",
append_images=frames[1:],
save_all=True,
duration=frame_time,
loop=0, # Infinite loop
disposal=2, # Remove previous frames for transparency
)
def init_plotter():
"""Init Pyvista plotter with custom scene layout"""
pl = pv.Plotter(notebook=False, off_screen=True, window_size=[300, 300])
pl.camera_position = [
(5, 5, 5), # Position of the camera
(0, 0, 0), # Focal point (what the camera is looking at)
(0, 0, 1), # View up direction
]
pl.camera.zoom(0.5)
pl.set_background("k") # For better transparency
return pl
def create_frames(frames):
"""Create frames with Pyvista."""
# Create Magpylib objects
mag1 = magpy.magnet.CylinderSegment(
dimension=(3, 4, 1, 0, 45), polarization=(0, 0, 1)
)
mag2 = magpy.magnet.CylinderSegment(
dimension=(2, 3, 1, 0, 45), polarization=(0, 0, -1)
)
images = []
pl = init_plotter()
for i in range(frames):
# Modify object positions
mag1.rotate_from_angax(360 / frames, axis="z")
mag2.rotate_from_angax(-360 / frames, axis="z")
# Transfer Magpylib objects to Pyvista plotter
pl.clear()
magpy.show(mag1, mag2, canvas=pl, style_legend_show=False)
# Edit figure in Pyvista
pl.add_mesh(pv.Line(mag1.barycenter, mag2.barycenter), color="cyan")
# Screenshot
print(f"Writing frame {i+1:3d}/{frames}")
ss = pl.screenshot(transparent_background=True, return_img=True)
images.append(ss)
pl.close()
return images
def main():
frames = 100
frame_time = 40
output_file = "my.gif"
images = create_frames(frames)
create_gif(images, frame_time, output_file)
if __name__ == "__main__":
main()
Notice that when providing a canvas, no update to its layout is performed by Magpylib, unless explicitly specified by setting canvas_update=True in show(). By default canvas_update='auto' only updates the canvas if is not provided by the user. Details can be found in the graphics documentation.
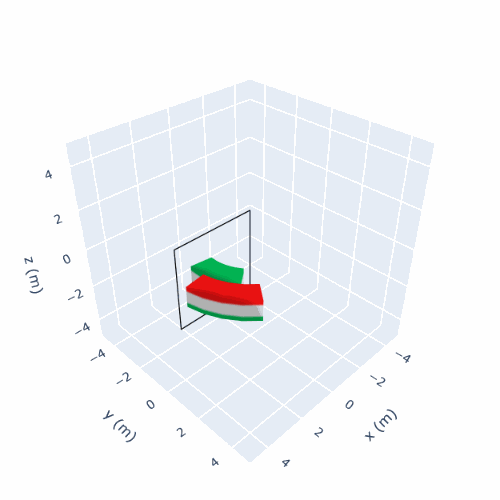
Custom Export Plotly#
The following examples shows how to work in the Plotly backend.
import magpylib as magpy
from PIL import Image
import io
def create_gif(images, frame_time, output_file):
"""Create GIF from frames in the temporary directory."""
frames = [Image.open(io.BytesIO(data)) for data in images]
if frames:
frames[0].save(
output_file,
format="GIF",
append_images=frames[1:],
save_all=True,
duration=frame_time,
loop=0, # Infinite loop
)
def create_frames(frames):
"""Create frames with Pyvista."""
# Create Magpylib objects
mag1 = magpy.magnet.CylinderSegment(
dimension=(3, 4, 1, 0, 45), polarization=(0, 0, 1)
)
mag2 = magpy.magnet.CylinderSegment(
dimension=(2, 3, 1, 0, 45), polarization=(0, 0, -1)
)
images = []
for i in range(frames):
# Set object position
mag1.rotate_from_angax(360 / frames, axis="z")
mag2.rotate_from_angax(-360 / frames, axis="z")
fig = magpy.show(
mag1, mag2, return_fig=True, backend="plotly", style_legend_show=False
)
# Edit figure in Plotly
fig.add_scatter3d(
x=(0, 0, 4, 4, 0),
y=(0, 0, 0, 0, 0),
z=(-2, 2, 2, -2, -2),
mode="lines",
line_color="black",
)
# Customize layout
fig.update_layout(
scene=dict(
camera_eye={"x": 1.5, "y": 1.5, "z": 1.5},
camera_up={"x": 0, "y": 0, "z": 1},
xaxis_range=(-5, 5),
yaxis_range=(-5, 5),
zaxis_range=(-5, 5),
),
showlegend=False,
margin=dict(l=0, r=0, t=0, b=0),
)
# Screenshot (requires kaleido package)
print(f"Writing frame {i+1:3d}/{frames}")
img = fig.to_image(format="png", width=500, height=500)
images.append(img)
return images
def main():
frames = 50
frame_time = 50
output_file = "my.gif"
images = create_frames(frames)
create_gif(images, frame_time, output_file)
if __name__ == "__main__":
main()